Don't understand GitHub—ready to give up

Instructions for Using Git on your Local Computer

One Time Steps:

  1. Download Git, nothing else: Link
  2. Open the Terminal: Link
  3. Learn to navigate in the Terminal: Link
  4. Go into the folder of the project, you want to use with Git (by using the commands you learned in Step 3)
  5. Terminal: Initialize this folder as a git project (called repo): git init

Repeated Steps:

  1. Editor: Create or edit your file, e.g. index.html with the Editor you already used (Atom, VSC, Sublime, Notepad, does NOT matter)
  2. Terminal: Now you can make a Snapshot of this file, like a Save Game in a Video Game: you add the changed files you want to add (e.g. index.html) to the Save Game, : git add index.html. Add as many files you want. If you didn’t change a file, you can’t add it, because git only tracks differences.
  3. Terminal: You have put your desired files into the Save Game. Now you have to give your Okay to actually save it: git commit -m "your message".
  4. Terminal: You can see a list of your Snapshots/Save Games: git log

Workflow Recap:

  • Initialize Project: git init
  • Add files into Save Game: git add [filename] . Add all files: git add . (a dot instead of the filename)
  • Confirm the Save Game: git commit -m "your message"
  • See a list of all your Save Games: git log
  • If you don’t know, which files you actually changed, you can check the status of your folder: git status

So, there are 3 commands to actually use git on your computer: init , add, commit

Now, there are two major issues:

  • How can I transfer my code to another computer?
  • How can I prevent my data from being lost, when my computer gets damaged?

That’s when an Online Git Hoster, e.g. Github, Bitbucket, Gitlab, comes into play.

…
…
…

Instructions for Sending your Local Git Files to an Online Git Hoster

One Time Steps:

  1. Create an account, e.g. Github
  2. Click + and New Repository, give it a name, do not include a readme (write one on your computer) and save it.
  3. Terminal: in your local Git folder: Now your local Git Project has to know, where it has to upload the data: git remote add origin https://github.com/yourName/yourRepo.git. You can find the actual link in your online repo.

Repeated Steps:

  1. Terminal: Now you can upload your data: git push origin master. You need your account data.

Workflow Recap:

  • Upload all your local Save Games to the Online Git Hoster: git push origin master

…
…
…

Summary

  • You need to install one tool: git
  • You need a Terminal. You can use the built-in Terminal or download another one.
  • If you want to upload your data, you need an account, e.g. Github, Bitbucket, Gitlab.

Complete Workflow (Recap of Section 1 and 2):

  • Initialize Project: git init
  • Add files into Save Game: git add [filename] . Add all files: git add . (a dot instead of the filename)
  • Confirm the Save Game: git commit -m "your message"
  • Upload all your local Save Games to the Online Git Hoster: git push origin master. You do not need to always push after commit. If you push once per day, all your Save Games will be pushed.
10 Likes

I think this is the best tutorial series for Git and everything about it, maybe it helps you too.
Git Tutorial Part 1: What is Version Control?

1 Like

Git and GitHub in Plain English

1 Like

This tutorial is fantastic. Thank you for going to the trouble of writing it. This part was especially useful:

  1. Learn to navigate in the Terminal: Link

I went through all the commands, and it helped to see the connection between the command line and the Home folder. Between these instructions and the tutorials suggested by @alpino and @ArielLeslie, I feel a little more grounded than yesterday. But I’ve been working on this for more than 6 hours now and still can’t get a site up. One page is there, but I can’t figure out how to add content and images to it. I probably could do it with SourceTree, but I decided to try it the hard way first. You lost me at step 7:

Terminal: Now you can make a Snapshot of this file, like a Save Game in a Video Game: you add the changed files you want to add (e.g. index.html) to the Save Game, : git add index.html. Add as many files you want. If you didn’t change a file, you can’t add it, because git only tracks differences.

I don’t play video games, so I don’t know what I’m supposed to do here. Is “Save Game” an actual command, or were you just making a comparison?

Also, once I get my repo initialized on the command line, do I need to keep going back to the terminal to make changes, as suggested in your workflow recap?

Repeated Steps:

  1. Terminal: Now you can upload your data: git push origin master.

If I don’t use an external editor (e.g., SourceTree or Sublime), can’t I just add files in GitHub and work on them there? And I guess I still don’t understand where the content goes. Is a repository supposed to consist of a single page?

Thanks, and apologies for being so dense on these points.

Melissa

Well you have local repo(your computer folder) and you push content of said folder to you online repo on github. You can also take content from other’s people repos, create your copy of it on github, then sync i.e make a copy on the local. Imagine github as google drive who tracks what is modified inside of any file inside repos. example: If you erased line of code in your file, then commited that change to your local repo, after that you pushed it to github and you realized you made mistake. You can reverse state before mistake by pulling back files from you online repo by targeting particular commit. Check one of my repo’s out and here’s how it looks on pages.

1 Like

Oh, so the interface I’ve been working with on GitHub is the local copy, and we’re pushing that content to appear online. OK. Duh. I’m starting to get what should be totally obvious. God help me if any future employer ever reads this post. :frowning:

Unfortunately, now that I’ve deleted my repos several times, my computer is getting confused—it’s trying to authenticate a new repo using the name of an old one. Maybe I should pick a new name.

One more stupid question: How do you save your work without committing? Is that what branches are for? Build everything in a branch and then use a pull request to merge the branch with the main repo? Thanks for your help.

If you’re afraid of work being lost, you don’t have to be. Each time you commit, there’s a timestamp that allows you to know when the file was saved. It’s also why it’s important to save with comments so you’ll know which save is the last stable set or what changes were made and so on.

That being said, you can just save locally (you’re usual ctrl+s). Committing means that it’s, how to say, saved in a more lasting manner and logged with Git’s logs.

At least, that’s my understanding. Anybody can correct me on this.

2 Likes

Take it easy.

Everytime you create a new project on your local PC, you first create a folder on your PC, let’s name it my-project. You can store as many data inside it. This is an ordinary folder just like every person has many folders on his/her PC. Nothing special.

If you now git init it, git creates an invisible folder in the folder my-project.
From then on, git tracks all you changes in this folder. Invisibly, in the background.
This folder is now called a repo, because it’s a ordinary folder + git.

Now you did some work in this folder, e.g. changing index.html or copying an image into it and you say “Hey, I want to make a Snapshot of the exact, current state!”. You do this, because perhaps later you want to come back to this old state or send the current state to another person.

Then you use git add to select the files, you want to add to this current snapshot. Maybe you have a todo-list in this folder, that other people should not see.

Then you use git commit to say “Okay, I’ve selected the correct files and I want to close this snapshot”.

After a while, you will have many of this snapshots (commits in git language). You can see them with git log.

Now you load your page and damn, it’s broke. You made a mistake, and want to undo it.
No problem, because you have this old snapshots/commits of your work, you can easily go back in time.

That’s what Git is all about.

Now there is Github. So let’s assume, that you made all your small snapshots/commits on your local pc, but your pc gets stolen or it gets broken and your data is lost. Therefore we should have an opportunity to upload your local repo to an online hoster.

The only thing left to do is to setup a repo online on Github and link the local repo and the online repo.
Then you can send your local repo to github via git push or can get the online repo to your pc git pull or git clone etc.

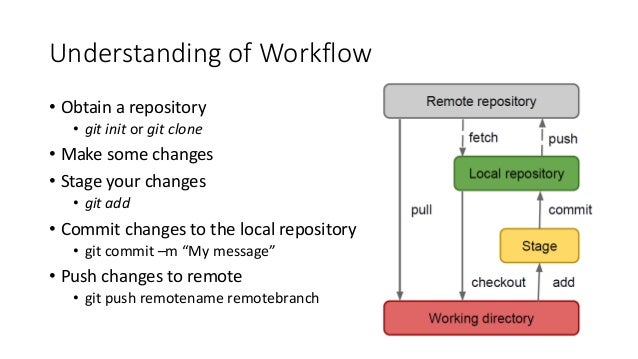
Here you can see a simplified workflow:
Diagram

5 Likes

Holy mackerel! Would you believe I get this? So if I understand it correctly, when I delete a repository on GitHub, it’s still hanging out as a git in my local directory unless I somehow pull in the deletion? Thanks so much.

A while back I grabbed some links to various project by fCC users that were intended for people to work on projects while getting familiar with GitHub… links below:

1 Like

Correct. If you push it once, it is on your Local Machine and on Github.
If you delete it on Github, but have it on your Local Machine,
you can push it again to Github in a new repo.

And vice versa, if you delete it on your local machine,
but pushed it before to Github, you can clone or pull it from Github.

Try to practice for a while. You will recognize,
that you are using a few commands very often.
Make sure you’re safe with them.

2 Likes

Try to practice for a while. You will recognize,
that you are using a few commands very often.
Make sure you’re safe with them.

Got it. I’ll go with the “sacrificial lamb” idea and practice a bit before I charge ahead with blog posts. You guys rock. Thanks, @miku86, @alpino, @codename11, @ArielLeslie, @zapcannon99, and @DarrenfJ!


The above reply was meant for @miku86.

Thank you, @DarrenfJ, for the links. Right now I’m too dangerous to contribute, but in a couple of weeks I’ll revisit the projects to see if I’m ready.

Despite the subject line (“ready to give up”), I tend to be doggedly persistent at figuring things out. Even though I’ve been in a deadlock these past 3 days, I’ve learned so much by reading the explanations here, visiting the links, and mudwrestling with GitHub. :grimacing:

4 Likes

Nice summary! Though, I think you have an infinite loop in #4 :wink:

“4. Go into the folder of the project, you want to use with Git (by using the commands you learned in Step 4)”

1 Like

Don’t worry, there’s no such thing as ‘too dangerous to contribute’. Most projects operate on a ‘pull request’ basis (you mention PRs above, so it sounds like you already understand the concept), which means that there’s never any danger of you directly messing up the master branch’s code.

There’s usually someone else reviewing the PR you’ve made, and they’ll make the merge when they’re happy it’s safe and does what your commit message says it does. Unless it’s a one-person project, it’s generally best practise to avoid merging your own PRs :slight_smile:

1 Like

Hi @MelissaJayne, I can recommend you GitHub Desktop, which is a user interface for Git based version control. Sounds GitHub specific, but you can use it with any Git repository.
I think the older version has a better user interface. So I can recommend using the old one just because of that.

They also have a really short and to the point guide here: Understanding the GitHub Flow. I am sure you could find similarly good explainer videos on YouTube.

You can find other useful guides here like Hello World and Getting Started with GitHub Pages.

1 Like

I think you should hope an employer does read this post. They would see that you had a problem. You tried plenty of ways to solve it yourself including asking for help on an appropriate forum. You collated all the I formation you were offered and did some more research and solved your problem. I’d say most employers would love to see that kind of initiative in an employee! :smile::+1:

1 Like

Not sure if you already got how git work.
I suggest you try out gitkraken. https://www.gitkraken.com/ it is free for non-commercial use. This is the easiest git UI imo.
and some basic command you will learn.

git clone
git add -A
git commit -m “<your message for this commit, usually some short summary of what you did on this change>”
git push
git pull

There are some little more annoying one but important that i suggest you try out desktop app like gitkraken or source tree first.

git checkout -b

Check out the term “gitignore” it really save your ass as you working on different framework like Node, Unity and such.
You can check version of your git .

git --version

you can see if your folder is the root of git by open finder and go to your finder. Make sure that you can see hidden file/folder by command+j . you will see a folder “.git” in there.
Git can work local, totally fine. but it better to store it some where online so you can easy to share and work on different computer that need. that why we have service like gitlab, github, bitbucket…

2 Likes

Hi Melissa, when I got my first job I was told to do this exercises, then I knew more git than most people in the office, strongly recommend sparing some time for it.

3 Likes

Wow, I’ve managed to stay away from Git because I wasn’t super clear on what it was and figured I’d “figure it out later”. This was very enlightening, thanks!

1 Like

So kind! Thank you for the encouragement. It really helped. :relaxed: