A good starting point would be to set up a new project using gradle or maven. If you open up a command prompt or bash script, you can do the following (if you’ve got gradle installed):
testuser@Mac github % mkdir test
testuser@Mac github % cd test
testuser@Mac test % gradle init
Starting a Gradle Daemon (subsequent builds will be faster)
> Task :wrapper

Select type of project to generate:
  1: basic
  2: application
  3: library
  4: Gradle plugin
Enter selection (default: basic) [1..4] 2

Select implementation language:
  1: C++
  2: Groovy
  3: Java
  4: Kotlin
  5: Scala
  6: Swift
Enter selection (default: Java) [1..6] 3

Split functionality across multiple subprojects?:
  1: no - only one application project
  2: yes - application and library projects
Enter selection (default: no - only one application project) [1..2] 1

Select build script DSL:
  1: Groovy
  2: Kotlin
Enter selection (default: Groovy) [1..2] 1

Select test framework:
  1: JUnit 4
  2: TestNG
  3: Spock
  4: JUnit Jupiter
Enter selection (default: JUnit 4) [1..4] 4

Project name (default: test):

> Task :init

Source package (default: test): com.test


> Task :init
Get more help with your project: https://docs.gradle.org/6.8.3/samples/sample_building_java_applications.html

BUILD SUCCESSFUL in 46s
2 actionable tasks: 2 executed
testuser@Mac test % ls
app		gradle		gradlew		gradlew.bat	settings.gradle
testuser@Mac test %
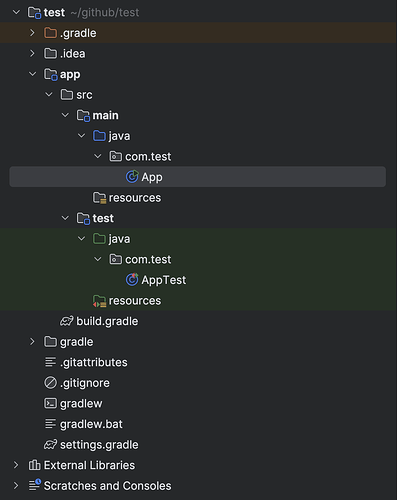
As we can see from our ls, it’s setup a basic project for us. Next, open IntelliJ and choose File -> Open... and then select the folder the project was initialised into above. Wait for it to load and then expand the project on the left. You should see something similar to the following:
We can also see it’s setup a test class for the App class in the main source folder. In my version of gradle, if we now open up the App class it should have something similar to the following:
public class App {
    public String getGreeting() {
        return "Hello World!";
    }

    public static void main(String[] args) {
        System.out.println(new App().getGreeting());
    }
}
If we now click on the AppTest, we should get:
class AppTest {
    @Test
    void appHasAGreeting() {
        App classUnderTest = new App();
        assertNotNull(classUnderTest.getGreeting(), "app should have a greeting");
    }
}
To run this test, simply click on the arrow in the margin to the left of the test. Alternatively, if you want to run all the tests in the class then click the green arrow to the left of the class name. If you wanted to run all tests in your project then you can right click on your java folder in the project structure and click Run tests in testapp... or something similar. When you run the tests you should see them as they’re being run in the Run window at the bottom which should open. Depending on your IntelliJ settings, the tests which successfully passed may be hidden, so to show them click on the tick icon in the Run toolbar.
Going back to the test, JUnit has a series of methods or are what called assertions so we can verify data being returned from a method. For example, if we add the method to our app class:
public int addNumber(int a, int b) {
    return a + b;
}
We could write a test to verify it’s returning what we expect with a pair of inputs:
@Test
void testAddNumbers() {
    App classUnderTest = new App();
    assertEquals(classUnderTest.addNumbers(2,2), 4);
}
This is the crux of unit testing really. When you get comfortable with that then you can start to look at other frameworks like Mockito and AssertJ.
To answer the rest of your questions:
3) The test class and package structure should match exactly that of your projects source code. As such, if you had a class in a source package com.test.service.MyService, your equivalent test would be in com.test.service.MyServiceTest in the test source folder.
4) Testing is pretty straightforward unless you’re dealing with reactive frameworks or concurrency. Also mocking can get a bit interesting if you have mocks which bleed results across tests, but I wouldn’t worry about that for now and just concentrate on getting to know the standard JUnit.
5) It’s been a while since I last used JUnit 4, but a few of the differences are that JUnit 5 is modular in nature rather than being monolithic like the former. It has additional features for finer grained control over test / class initialisation of resources and subsequent cleanup. JUnit 4 is Java 5+ whereas JUnit 5 is Java 8+ minimum. Greater extension support etc
